Difference between revisions of "AnyWave:WritePythonScripted"
(→Writing the desc.txt file) |
(→The Python module) |
||
| Line 48: | Line 48: | ||
The module provides methods and attributes that will allow interactions between AnyWave and the Python script's environment. | The module provides methods and attributes that will allow interactions between AnyWave and the Python script's environment. | ||
| + | {| class="wikitable" | ||
| + | |- | ||
| + | ! Attributes !! Short description | ||
| + | |- | ||
| + | | input_channels || The list of input channels set for the plug-in by AnyWave. | ||
| + | |- | ||
| + | | data_path || The full path to the data file. (Empty before calling getDataInfo or getData) | ||
| + | |- | ||
| + | | total_duration || The total duration of data in seconds, value is 0 until a call to getData or getDataInfo is done. | ||
| + | |- | ||
| + | |} | ||
Revision as of 13:48, 30 July 2014
Contents
Introduction
This section targets people who have a good knowledge and practice of the Python programming language.
The purpose is to explain how to write a Python script that will be the heart of a plug-in executed by AnyWave.
We will also explain how to create a text file to describe our plug-in to AnyWave
The AnyWave-Python API (Application Programming Interface) consists in a Python module that is automatically imported in the Python environment by AnyWave.
Where to start?
The first thing to do is to create the basic structure for a plug-in.
A Python Scripted plug-in is very simple, it is a folder containing at least two files:
- desc.txt (a text file describing the plug-in)
- __main__.py (the Python code)
Writing the desc.txt file
The file must be named desc.txt and may looks like:
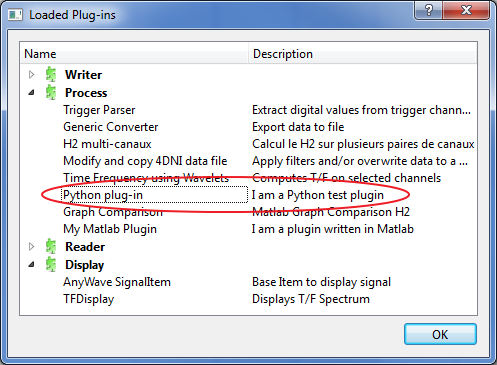
name = Python plug-in
description = I am a Python test plugin
category = Process:Python:My Python Plugin
The category line is optional. It tells AnyWave where the plug-in will appear in the menus. Here we decided to caterogize it as a Process, with a sub category called Python. Finally, the plug-in name will be My Python Plugin.
The category feature is usefull to separate plug-in that won't really do some calculation but convert data to another format on launch external tools.
Three category keywords are recognized:
- Process : The plug-in will be set in the Processes menu with a subcategory and a name, for example 'Process:Correlation:Compute correlation'
- File: The plug-in will be set in the File Menu under the Export sub-menu. Example : 'File:Export to Numpy array format'
- View: The plug-in will be set in the View Menu. Example : 'View:Launch 3D viewer'
If no category is specified, AnyWave will set the plug-in in the Processes menu using the name defined in the file.
Copy the folder to the right location
The prefered location is the user's AnyWave directory.
See that the folder is placed in the Python subfolder. This will allow AnyWave to recognize it as a Python plug-in.
Check that the plug-in is available
The Python module
AnyWave will execute the Python plug-in in a separated Python environment which is embedded in the application.
A Python interpreter will execute the script '__main.py__' of our plug-in.
Before the script is being executed, AnyWave will do some initializing like importing a module named anywave in the Python's environment.
The module provides methods and attributes that will allow interactions between AnyWave and the Python script's environment.
| Attributes | Short description |
|---|---|
| input_channels | The list of input channels set for the plug-in by AnyWave. |
| data_path | The full path to the data file. (Empty before calling getDataInfo or getData) |
| total_duration | The total duration of data in seconds, value is 0 until a call to getData or getDataInfo is done. |

